변경되는 리소스 시각화하기
PR에서 어떤 리소스가 변화하는지 시각화해서 볼 수 있다면, 좀 더 빠르게 변화를 파악할 수 있을겁니다. 이번에는 Pluralith를 통해 리소스 변화를 시각화한 내용을 PR 코멘트에 자동으로 추가하는 작업을 해봅시다.
Pluralith 계정 만들기
Pluralith에 접속하여 Sign Up을 통해 계정을 생성합니다.
yaml 작성하기
.github/workflows/terraform-pr.yaml 에 다음을 추가합니다.
.github/workflows/terraform-pr.yaml
jobs:
  ...

  pluralith:
    runs-on: ubuntu-latest
    env:
      working-directory: ./practice
    steps:
      - name: Check out repository
        uses: actions/checkout@v3
        with:
          ref: ${{ github.event.pull_request.head.ref }}

      # Set up Terraform
      - name: Setup Terraform
        uses: hashicorp/setup-terraform@v1
        with:
          terraform_wrapper: false # This is recommended so the `terraform show` command outputs valid JSON
        env:
          GOOGLE_CREDENTIALS: ${{ secrets.GOOGLE_CREDENTIALS }}

      # Init Terraform project
      - name: Terraform Init
        run: terraform init
        working-directory: ${{ env.working-directory }}
        env:
          GOOGLE_CREDENTIALS: ${{ secrets.GOOGLE_CREDENTIALS }}

      - name: Setup Infracost
        uses: infracost/actions/setup@v2
        # See https://github.com/infracost/actions/tree/master/setup for other inputs
        # If you can't use this action, see Docker images in https://infracost.io/cicd
        with:
          api-key: ${{ secrets.INFRACOST_API_KEY }}

      # Set up and authenticate Pluralith
      - name: Pluralith Init
        uses: Pluralith/actions/init@v1.1.0
        with:
          terraform-path: ${{ env.working-directory }}
          api-key: ${{ secrets.PLURALITH_API_KEY }}
          project-id: ${{ secrets.PLURALITH_PROJECT_ID }}
        env:
          GOOGLE_CREDENTIALS: ${{ secrets.GOOGLE_CREDENTIALS }}

      # Run Pluralith to generate an infrastructure diagram and comment body
      - name: Pluralith Run
        uses: Pluralith/actions/run@v1.1.0
        with:
          title: \#${{ github.event.number }}
          terraform-path: ${{ env.working-directory }}
          show-changes: true
          show-drift: true
          show-costs: true # Requires Infracost to be set up in your pipeline
        env:
          GOOGLE_CREDENTIALS: ${{ secrets.GOOGLE_CREDENTIALS }}

      # Post the generated diagram as a GitHub comment
      - name: Pluralith Comment
        uses: Pluralith/actions/comment@v1.1.0
        with:
          terraform-path: ${{ env.working-directory }}
          behavior: hide-and-new
        env:
          GOOGLE_CREDENTIALS: ${{ secrets.GOOGLE_CREDENTIALS }}
전체 코드 보기
.github/workflows/terraform-pr.yaml
on:
  pull_request:
    branches:
      - main

jobs:
  terraform-pr:
    runs-on: ubuntu-latest
    defaults:
      run:
        working-directory: ./practice
    steps:
    - name: Checkout
      uses: actions/checkout@v3
      with:
        ref: ${{ github.event.pull_request.head.ref }}

    - name: Setup Terraform
      uses: hashicorp/setup-terraform@v2
      with:
        terraform_version: 1.2.8

    - name: Terraform Init
      id: init
      run: terraform init
      env:
        GOOGLE_CREDENTIALS: ${{ secrets.GOOGLE_CREDENTIALS }}

    - name: Terraform Validate
      id: validate
      run: terraform validate
      env:
        GOOGLE_CREDENTIALS: ${{ secrets.GOOGLE_CREDENTIALS }}

    - name: Terraform Format
      id: fmt
      run: terraform fmt -check
      continue-on-error: true
      env:
        GOOGLE_CREDENTIALS: ${{ secrets.GOOGLE_CREDENTIALS }}

    - name: Render terraform docs and push changes back to PR
      uses: terraform-docs/gh-actions@main
      with:
        working-dir: ./practice
        output-file: README.md
        output-method: inject
        git-push: "true"
        recursive: "true"

    - name: Terraform Plan
      id: plan
      run: terraform plan -no-color
      continue-on-error: true
      env:
        GOOGLE_CREDENTIALS: ${{ secrets.GOOGLE_CREDENTIALS }}

    - uses: actions/github-script@v6
      if: github.event_name == 'pull_request'
      env:
        PLAN: "terraform\n${{ steps.plan.outputs.stdout }}"
        GOOGLE_CREDENTIALS: ${{ secrets.GOOGLE_CREDENTIALS }}
      with:
        github-token: ${{ secrets.GITHUB_TOKEN }}
        script: |
          const output = `#### Terraform Format and Style 🖌\`${{ steps.fmt.outcome }}\`
          #### Terraform Validation 🤖\`${{ steps.validate.outcome }}\`
          <details><summary>Validation Output</summary>

          \`\`\`\n
          ${{ steps.validate.outputs.stdout }}
          \`\`\`

          </details>

          #### Terraform Plan 📖\`${{ steps.plan.outcome }}\`

          <details><summary>Show Plan</summary>

          \`\`\`tf\n
          ${process.env.PLAN}
          \`\`\`

          </details>

          *Pusher: @${{ github.actor }}, Action: \`${{ github.event_name }}\`, Workflow: \`${{ github.workflow }}\`*`;

          github.rest.issues.createComment({
            issue_number: context.issue.number,
            owner: context.repo.owner,
            repo: context.repo.repo,
            body: output
          })
  infracost:
    runs-on: ubuntu-latest
    permissions:
      contents: read
      pull-requests: write

    env:
      TF_ROOT: ./practice
      # This instructs the CLI to send cost estimates to Infracost Cloud. Our SaaS product
      #   complements the open source CLI by giving teams advanced visibility and controls.
      #   The cost estimates are transmitted in JSON format and do not contain any cloud
      #   credentials or secrets (see https://infracost.io/docs/faq/ for more information).
      INFRACOST_ENABLE_CLOUD: true
      # If you're using Terraform Cloud/Enterprise and have variables or private modules stored
      # on there, specify the following to automatically retrieve the variables:
      #   INFRACOST_TERRAFORM_CLOUD_TOKEN: ${{ secrets.TFC_TOKEN }}
      #   INFRACOST_TERRAFORM_CLOUD_HOST: app.terraform.io # Change this if you're using Terraform Enterprise

    steps:
      # If you use private modules, add an environment variable or secret
      # called GIT_SSH_KEY with your private key, so Infracost can access
      # private repositories (similar to how Terraform/Terragrunt does).
      # - name: add GIT_SSH_KEY
      #   run: |
      #     ssh-agent -a $SSH_AUTH_SOCK
      #     mkdir -p ~/.ssh
      #     echo "${{ secrets.GIT_SSH_KEY }}" | tr -d '\r' | ssh-add -
      #     ssh-keyscan github.com >> ~/.ssh/known_hosts

      - name: Setup Infracost
        uses: infracost/actions/setup@v2
        # See https://github.com/infracost/actions/tree/master/setup for other inputs
        # If you can't use this action, see Docker images in https://infracost.io/cicd
        with:
          api-key: ${{ secrets.INFRACOST_API_KEY }}

      # Checkout the base branch of the pull request (e.g. main/master).
      - name: Checkout base branch
        uses: actions/checkout@v2
        with:
          ref: '${{ github.event.pull_request.base.ref }}'

      # Generate Infracost JSON file as the baseline.
      - name: Generate Infracost cost estimate baseline
        run: |
          infracost breakdown --path=${TF_ROOT} \
                              --format=json \
                              --out-file=/tmp/infracost-base.json

      # Checkout the current PR branch so we can create a diff.
      - name: Checkout PR branch
        uses: actions/checkout@v2

      # Generate an Infracost diff and save it to a JSON file.
      - name: Generate Infracost diff
        run: |
          infracost diff --path=${TF_ROOT} \
                          --format=json \
                          --compare-to=/tmp/infracost-base.json \
                          --out-file=/tmp/infracost.json

      # Posts a comment to the PR using the 'update' behavior.
      # This creates a single comment and updates it. The "quietest" option.
      # The other valid behaviors are:
      #   delete-and-new - Delete previous comments and create a new one.
      #   hide-and-new - Minimize previous comments and create a new one.
      #   new - Create a new cost estimate comment on every push.
      # See https://www.infracost.io/docs/features/cli_commands/#comment-on-pull-requests for other options.
      - name: Post Infracost comment
        run: |
            infracost comment github --path=/tmp/infracost.json \
                                     --repo=$GITHUB_REPOSITORY \
                                     --github-token=${{github.token}} \
                                     --pull-request=${{github.event.pull_request.number}} \
                                     --behavior=hide-and-new
  pluralith:
    runs-on: ubuntu-latest
    env:
      working-directory: ./practice
    steps:
      - name: Check out repository
        uses: actions/checkout@v3
        with:
          ref: ${{ github.event.pull_request.head.ref }}

      # Set up Terraform
      - name: Setup Terraform
        uses: hashicorp/setup-terraform@v1
        with:
          terraform_wrapper: false # This is recommended so the `terraform show` command outputs valid JSON
        env:
          GOOGLE_CREDENTIALS: ${{ secrets.GOOGLE_CREDENTIALS }}

      # Init Terraform project
      - name: Terraform Init
        run: terraform init
        working-directory: ${{ env.working-directory }}
        env:
          GOOGLE_CREDENTIALS: ${{ secrets.GOOGLE_CREDENTIALS }}

      - name: Setup Infracost
        uses: infracost/actions/setup@v2
        # See https://github.com/infracost/actions/tree/master/setup for other inputs
        # If you can't use this action, see Docker images in https://infracost.io/cicd
        with:
          api-key: ${{ secrets.INFRACOST_API_KEY }}

      # Set up and authenticate Pluralith
      - name: Pluralith Init
        uses: Pluralith/actions/init@v1.1.0
        with:
          terraform-path: ${{ env.working-directory }}
          api-key: ${{ secrets.PLURALITH_API_KEY }}
          project-id: ${{ secrets.PLURALITH_PROJECT_ID }}
        env:
          GOOGLE_CREDENTIALS: ${{ secrets.GOOGLE_CREDENTIALS }}

      # Run Pluralith to generate an infrastructure diagram and comment body
      - name: Pluralith Run
        uses: Pluralith/actions/run@v1.1.0
        with:
          title: \#${{ github.event.number }}
          terraform-path: ${{ env.working-directory }}
          show-changes: true
          show-drift: true
          show-costs: true # Requires Infracost to be set up in your pipeline
        env:
          GOOGLE_CREDENTIALS: ${{ secrets.GOOGLE_CREDENTIALS }}

      # Post the generated diagram as a GitHub comment
      - name: Pluralith Comment
        uses: Pluralith/actions/comment@v1.1.0
        with:
          terraform-path: ${{ env.working-directory }}
          behavior: hide-and-new
        env:
          GOOGLE_CREDENTIALS: ${{ secrets.GOOGLE_CREDENTIALS }}
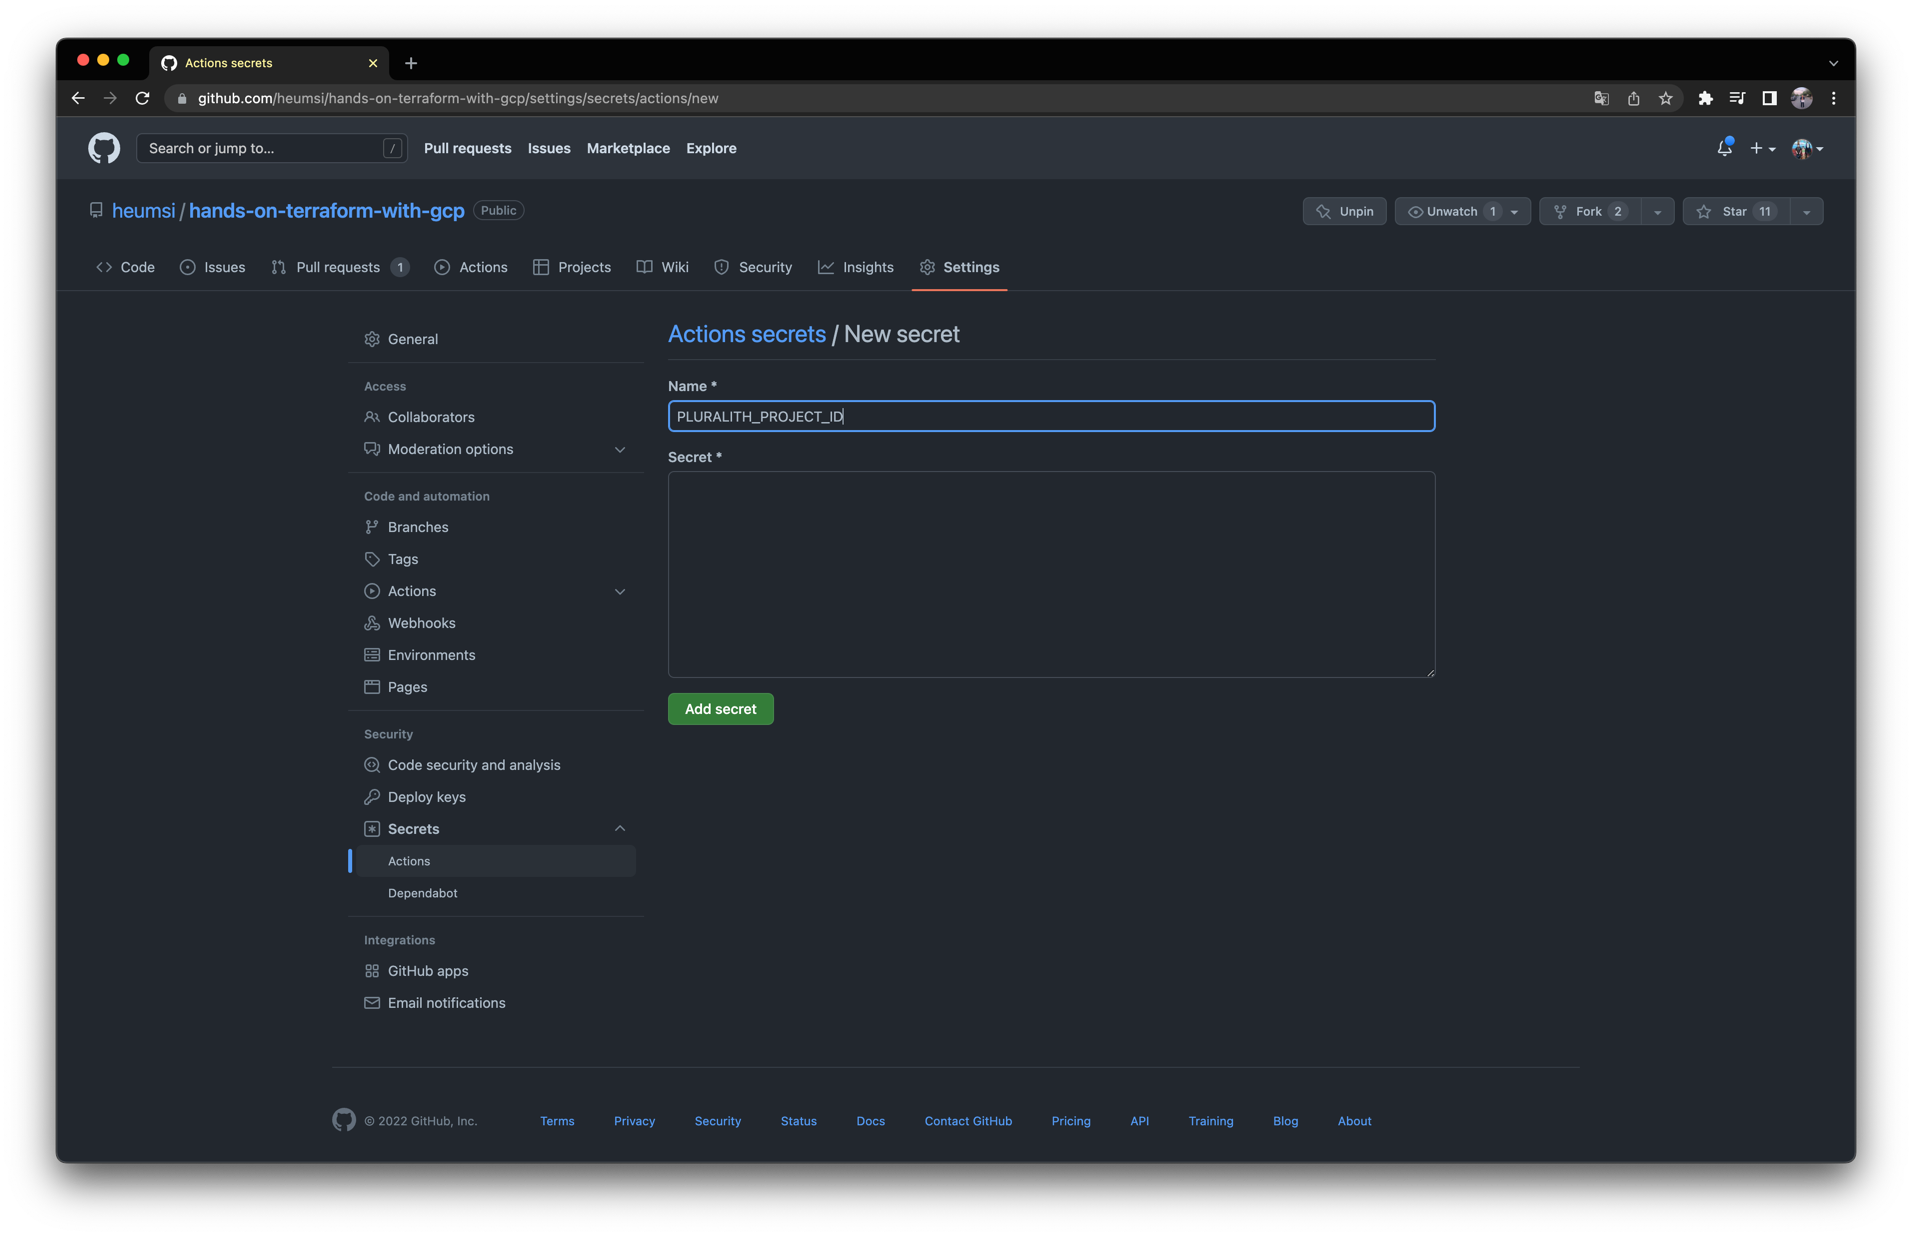
Secret 추가하기
위 yaml을 보면 다음 두 개의 Github Repository의 Secret을 사용하는 부분이 보입니다.
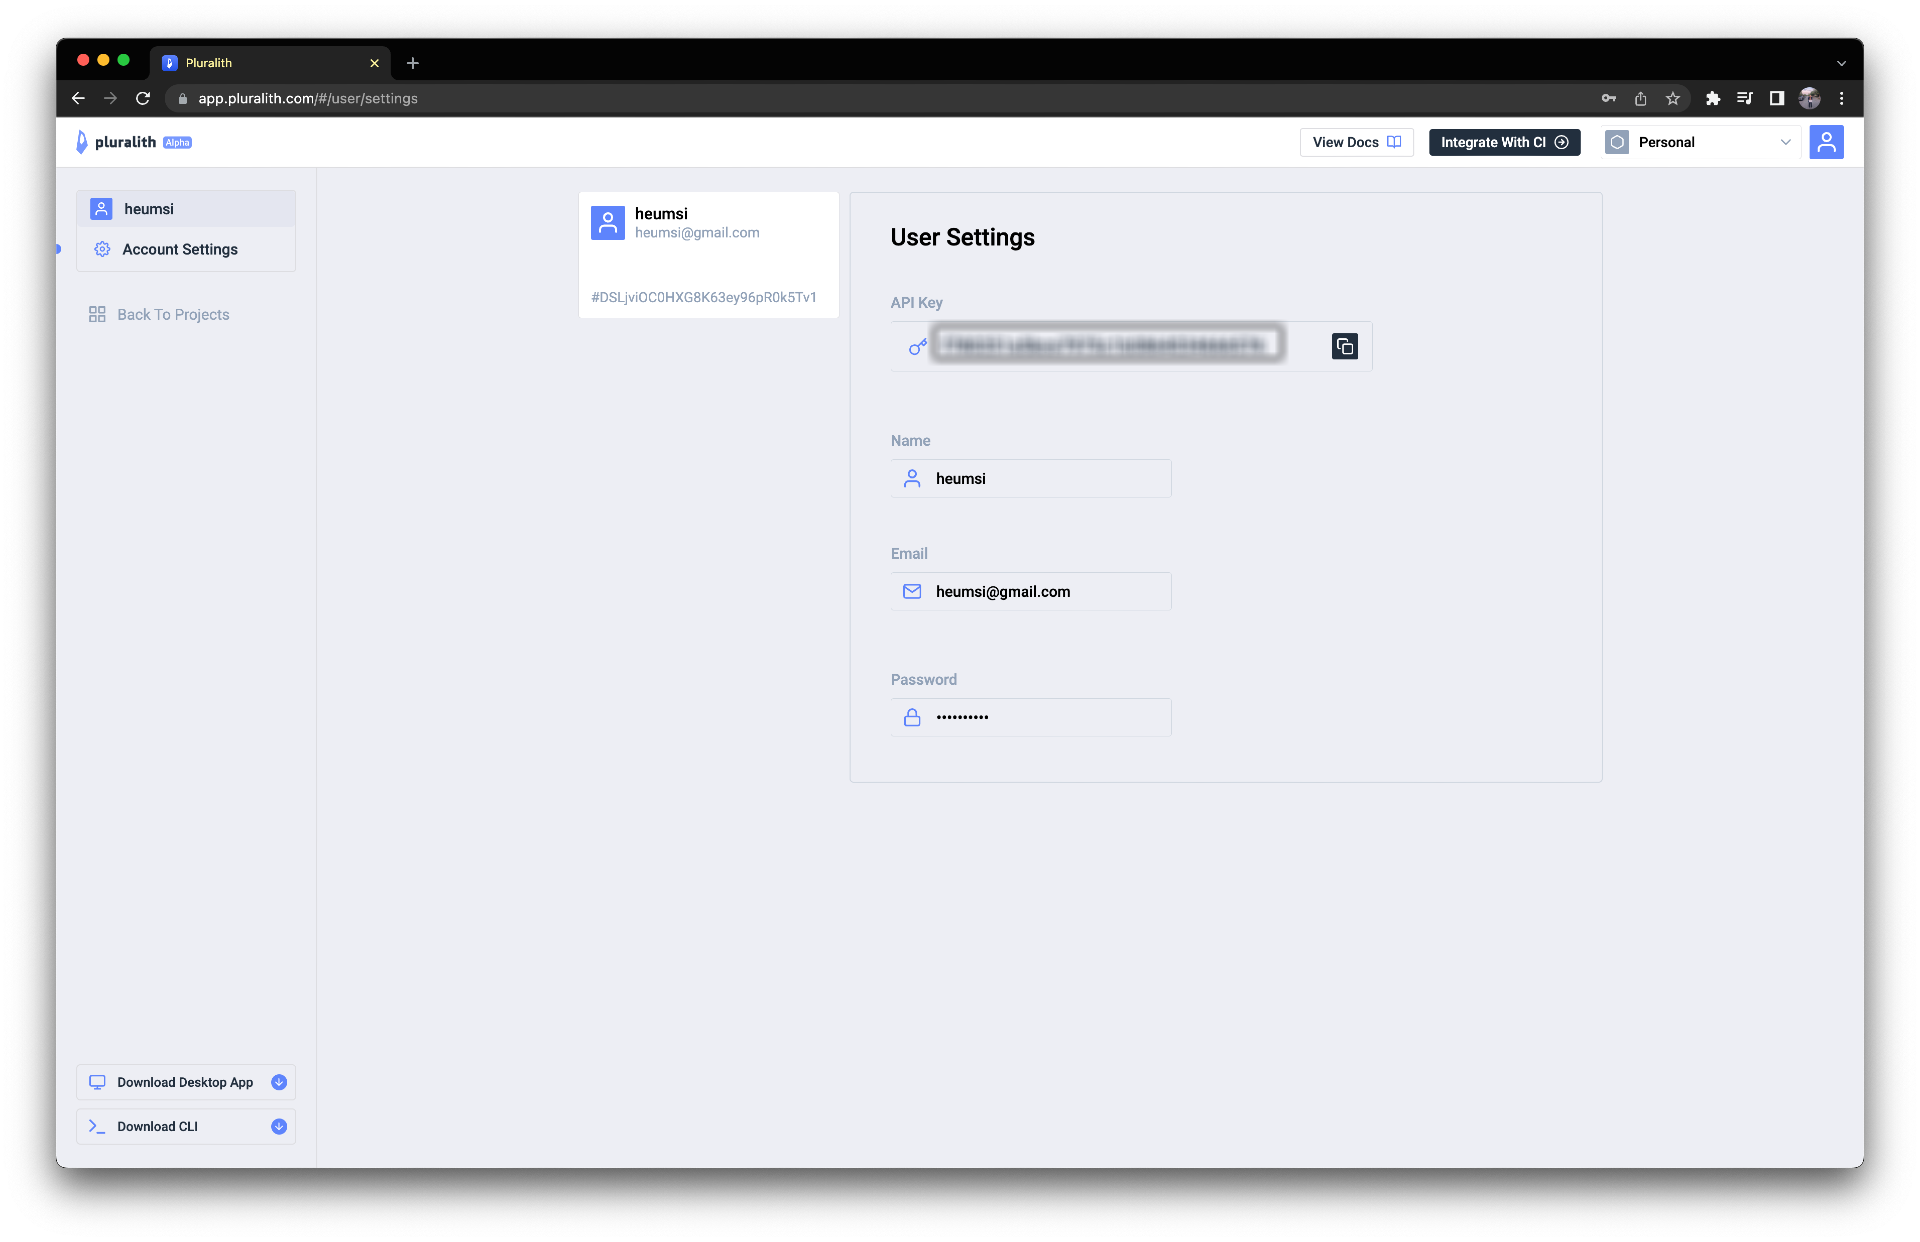
${{ secrets.PLURALITH_API_KEY }}${{ secrets.PLURALITH_PROJECT_ID }}
이 값들은 다음처럼 Pluralith 웹 대시보드에서 확인하실 수 있습니다.
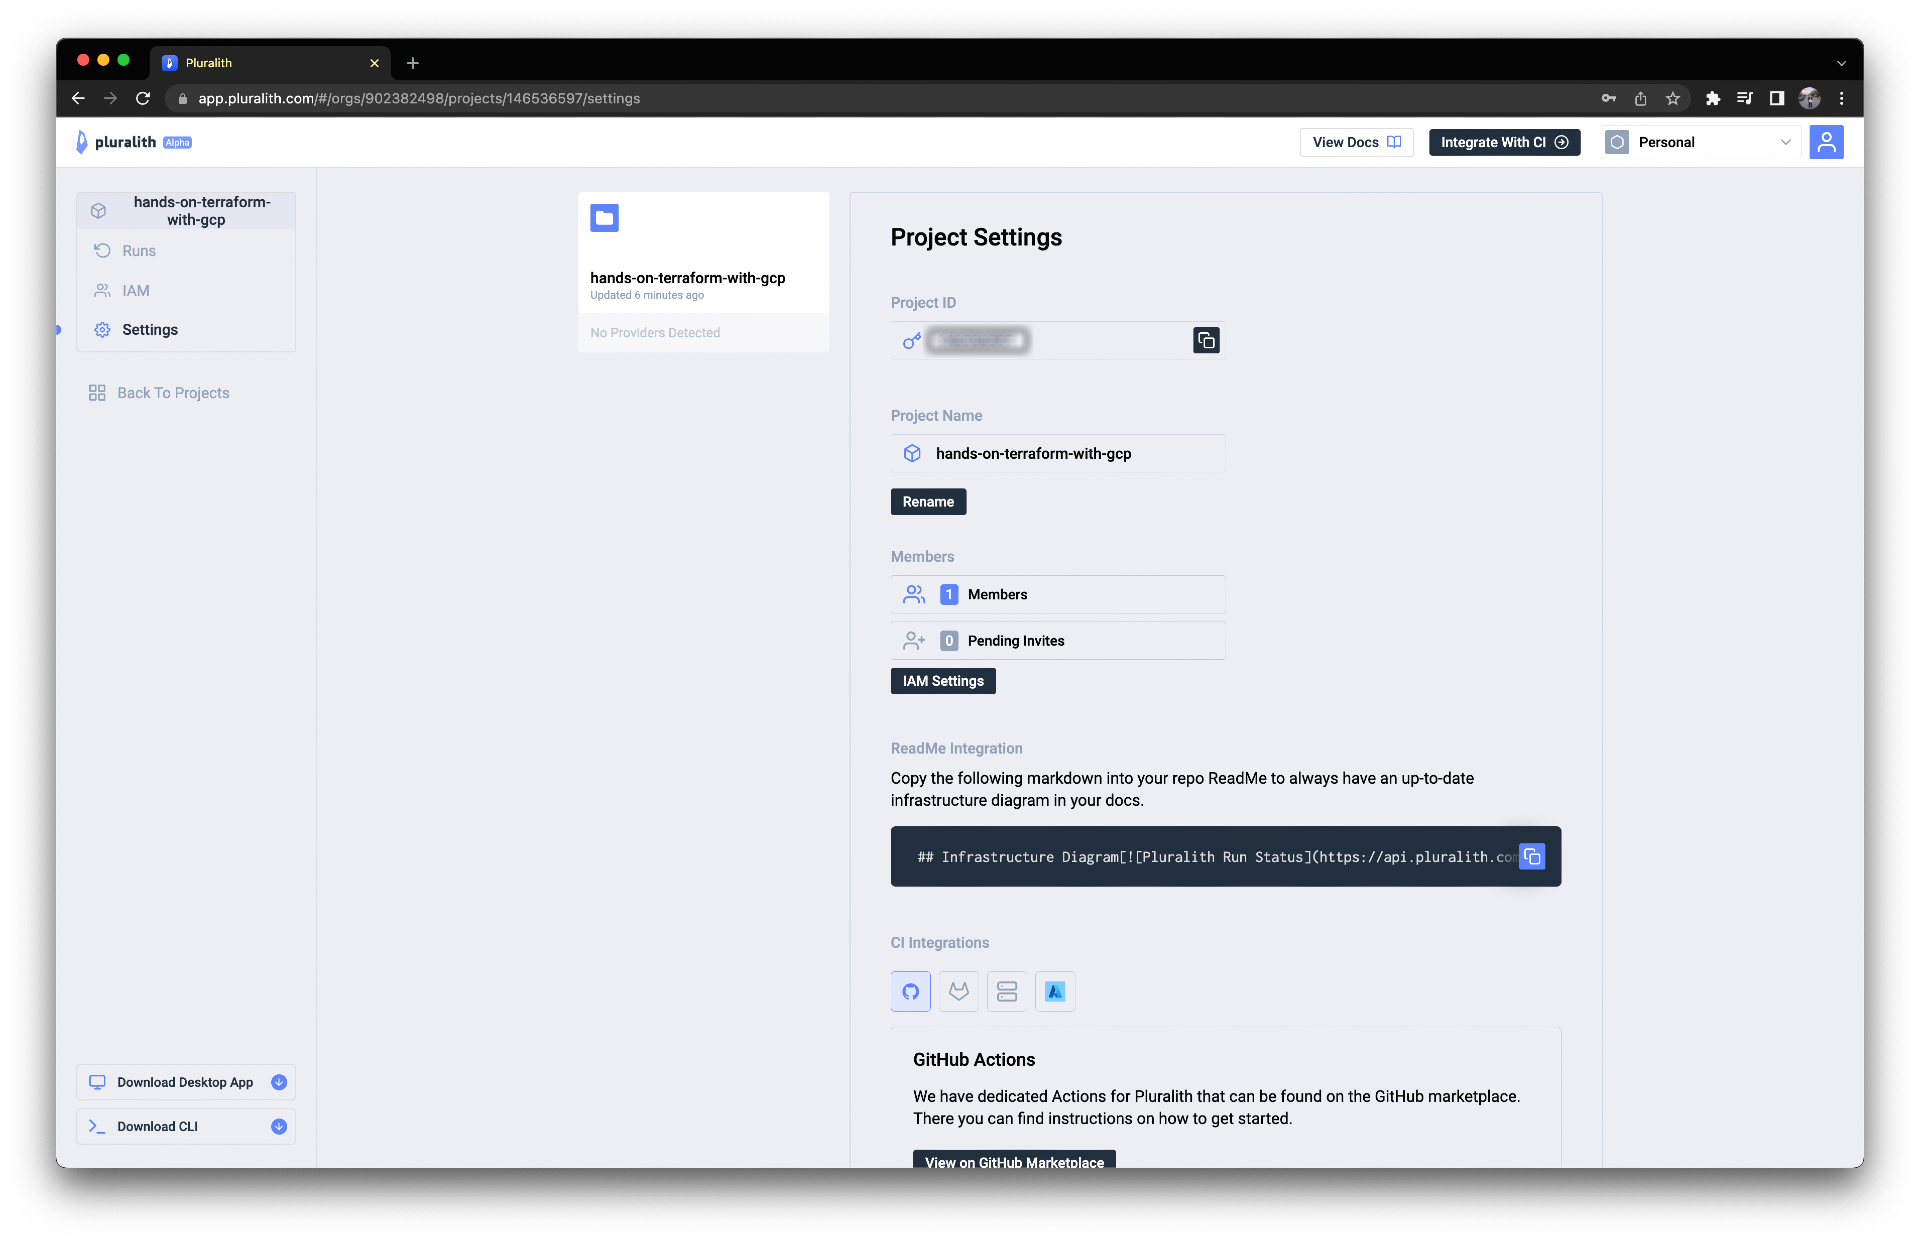
웹 Github Repository Web UI로 들어가 다음처럼 PLURALITH_API_KEY 와 PLURALITH_PROJECT_ID Secret을 작성해줍시다.

결과 확인하기
이제 작성한 Github Action이 잘 작동하는지 확인해봅시다.
먼저 위 변경사항을 다음처럼 커밋하고 푸시합니다.
$ git add .github/
$ git commit -m "Add pluralith job in github action on pr"
$ git push origin main
이제 새 브랜치를 만들고, google_compute_instance 를 하나 더 추가해봅시다.
modules/compute/main.tf
...

resource "google_compute_instance" "hotwg_asne3_prod_2" {
  name         = "hotwg-asne3-prod-2"
  machine_type = "e2-medium"
  zone         = "asia-northeast3-c"

  boot_disk {
    initialize_params {
      image = "debian-cloud/debian-11"
    }
  }

  network_interface {
    subnetwork = var.subnetwork.id
    # access_config {
    #   nat_ip = var.nat_ip.address
    # }
  }

  service_account {
    email  = var.service_account.email
    scopes = ["cloud-platform"]
  }

  tags = ["allow-http", "allow-ssh"]

  metadata = {
    ssh-keys = "default:ssh-rsa AAAAB3NzaC1yc2EAAAADAQABAAABgQCwdCxPcVEslNkuIA508cd8xRucUIIdKy8PNdHzoFLOzt1HXUtDD6y/pVmqEut4P6DMPPt7WNI8JkqBL7a9FlFIHmLK5hR7aHVKJt7bL/bHacdIH3MagjfwRBmHGY2kTEP+/WSVW6bhqyI5P5dFy22RZt7POqvvzCYnp5rzzl8JBDOjjtLmQz1XwK0Hoa5ue3W1GX8N+TxUo5/psNM4WhHHPZRkRr/lSZqhO4QfwjGK3K88YVyR0kZWWCDsEW/zRZrJgU9/q8oU161Fu/vTZBDw9FoYRfCQ1FfjAw1Wpp1ftXI3hkAyGFf9Ezvfuv5teVO0JnAs5HQ7h8BFw92J45AUSAXcG/yoezqMj/vW3FP08geQhLCZaohc70A5PNkBv90ByACebsOaQ6dbrcdzlZr2KMe2noT9zyr0KMcDmrB7wyUf8jqdRJE7HY4epK+VNwqeZnpvj3n+fHURD2k+Bs8Cpoa6FYfXYW1iRCb+Xe7V7eqHBHTvtGz9o2SfY2a/cC8= user@AL02261967.local"
  }
}
전체 코드 보기
modules/compute/main.tf
resource "google_compute_instance" "hotwg_asne3_prod_1" {
  name         = "hotwg-asne3-prod-1"
  machine_type = "e2-medium"
  zone         = "asia-northeast3-c"

  boot_disk {
    initialize_params {
      image = "debian-cloud/debian-11"
    }
  }

  network_interface {
    subnetwork = var.subnetwork.id
    access_config {
      nat_ip = var.nat_ip.address
    }
  }

  service_account {
    email  = var.service_account.email
    scopes = ["cloud-platform"]
  }

  tags = ["allow-http", "allow-ssh"]

  metadata = {
    ssh-keys = "default:ssh-rsa AAAAB3NzaC1yc2EAAAADAQABAAABgQCwdCxPcVEslNkuIA508cd8xRucUIIdKy8PNdHzoFLOzt1HXUtDD6y/pVmqEut4P6DMPPt7WNI8JkqBL7a9FlFIHmLK5hR7aHVKJt7bL/bHacdIH3MagjfwRBmHGY2kTEP+/WSVW6bhqyI5P5dFy22RZt7POqvvzCYnp5rzzl8JBDOjjtLmQz1XwK0Hoa5ue3W1GX8N+TxUo5/psNM4WhHHPZRkRr/lSZqhO4QfwjGK3K88YVyR0kZWWCDsEW/zRZrJgU9/q8oU161Fu/vTZBDw9FoYRfCQ1FfjAw1Wpp1ftXI3hkAyGFf9Ezvfuv5teVO0JnAs5HQ7h8BFw92J45AUSAXcG/yoezqMj/vW3FP08geQhLCZaohc70A5PNkBv90ByACebsOaQ6dbrcdzlZr2KMe2noT9zyr0KMcDmrB7wyUf8jqdRJE7HY4epK+VNwqeZnpvj3n+fHURD2k+Bs8Cpoa6FYfXYW1iRCb+Xe7V7eqHBHTvtGz9o2SfY2a/cC8= user@AL02261967.local"
  }
}

resource "google_compute_instance" "hotwg_asne3_prod_2" {
  name         = "hotwg-asne3-prod-2"
  machine_type = "e2-medium"
  zone         = "asia-northeast3-c"

  boot_disk {
    initialize_params {
      image = "debian-cloud/debian-11"
    }
  }

  network_interface {
    subnetwork = var.subnetwork.id
    # access_config {
    #   nat_ip = var.nat_ip.address
    # }
  }

  service_account {
    email  = var.service_account.email
    scopes = ["cloud-platform"]
  }

  tags = ["allow-http", "allow-ssh"]

  metadata = {
    ssh-keys = "default:ssh-rsa AAAAB3NzaC1yc2EAAAADAQABAAABgQCwdCxPcVEslNkuIA508cd8xRucUIIdKy8PNdHzoFLOzt1HXUtDD6y/pVmqEut4P6DMPPt7WNI8JkqBL7a9FlFIHmLK5hR7aHVKJt7bL/bHacdIH3MagjfwRBmHGY2kTEP+/WSVW6bhqyI5P5dFy22RZt7POqvvzCYnp5rzzl8JBDOjjtLmQz1XwK0Hoa5ue3W1GX8N+TxUo5/psNM4WhHHPZRkRr/lSZqhO4QfwjGK3K88YVyR0kZWWCDsEW/zRZrJgU9/q8oU161Fu/vTZBDw9FoYRfCQ1FfjAw1Wpp1ftXI3hkAyGFf9Ezvfuv5teVO0JnAs5HQ7h8BFw92J45AUSAXcG/yoezqMj/vW3FP08geQhLCZaohc70A5PNkBv90ByACebsOaQ6dbrcdzlZr2KMe2noT9zyr0KMcDmrB7wyUf8jqdRJE7HY4epK+VNwqeZnpvj3n+fHURD2k+Bs8Cpoa6FYfXYW1iRCb+Xe7V7eqHBHTvtGz9o2SfY2a/cC8= user@AL02261967.local"
  }
}
이제 변경사항을 커밋하고, 새 브랜치로 푸시합니다.
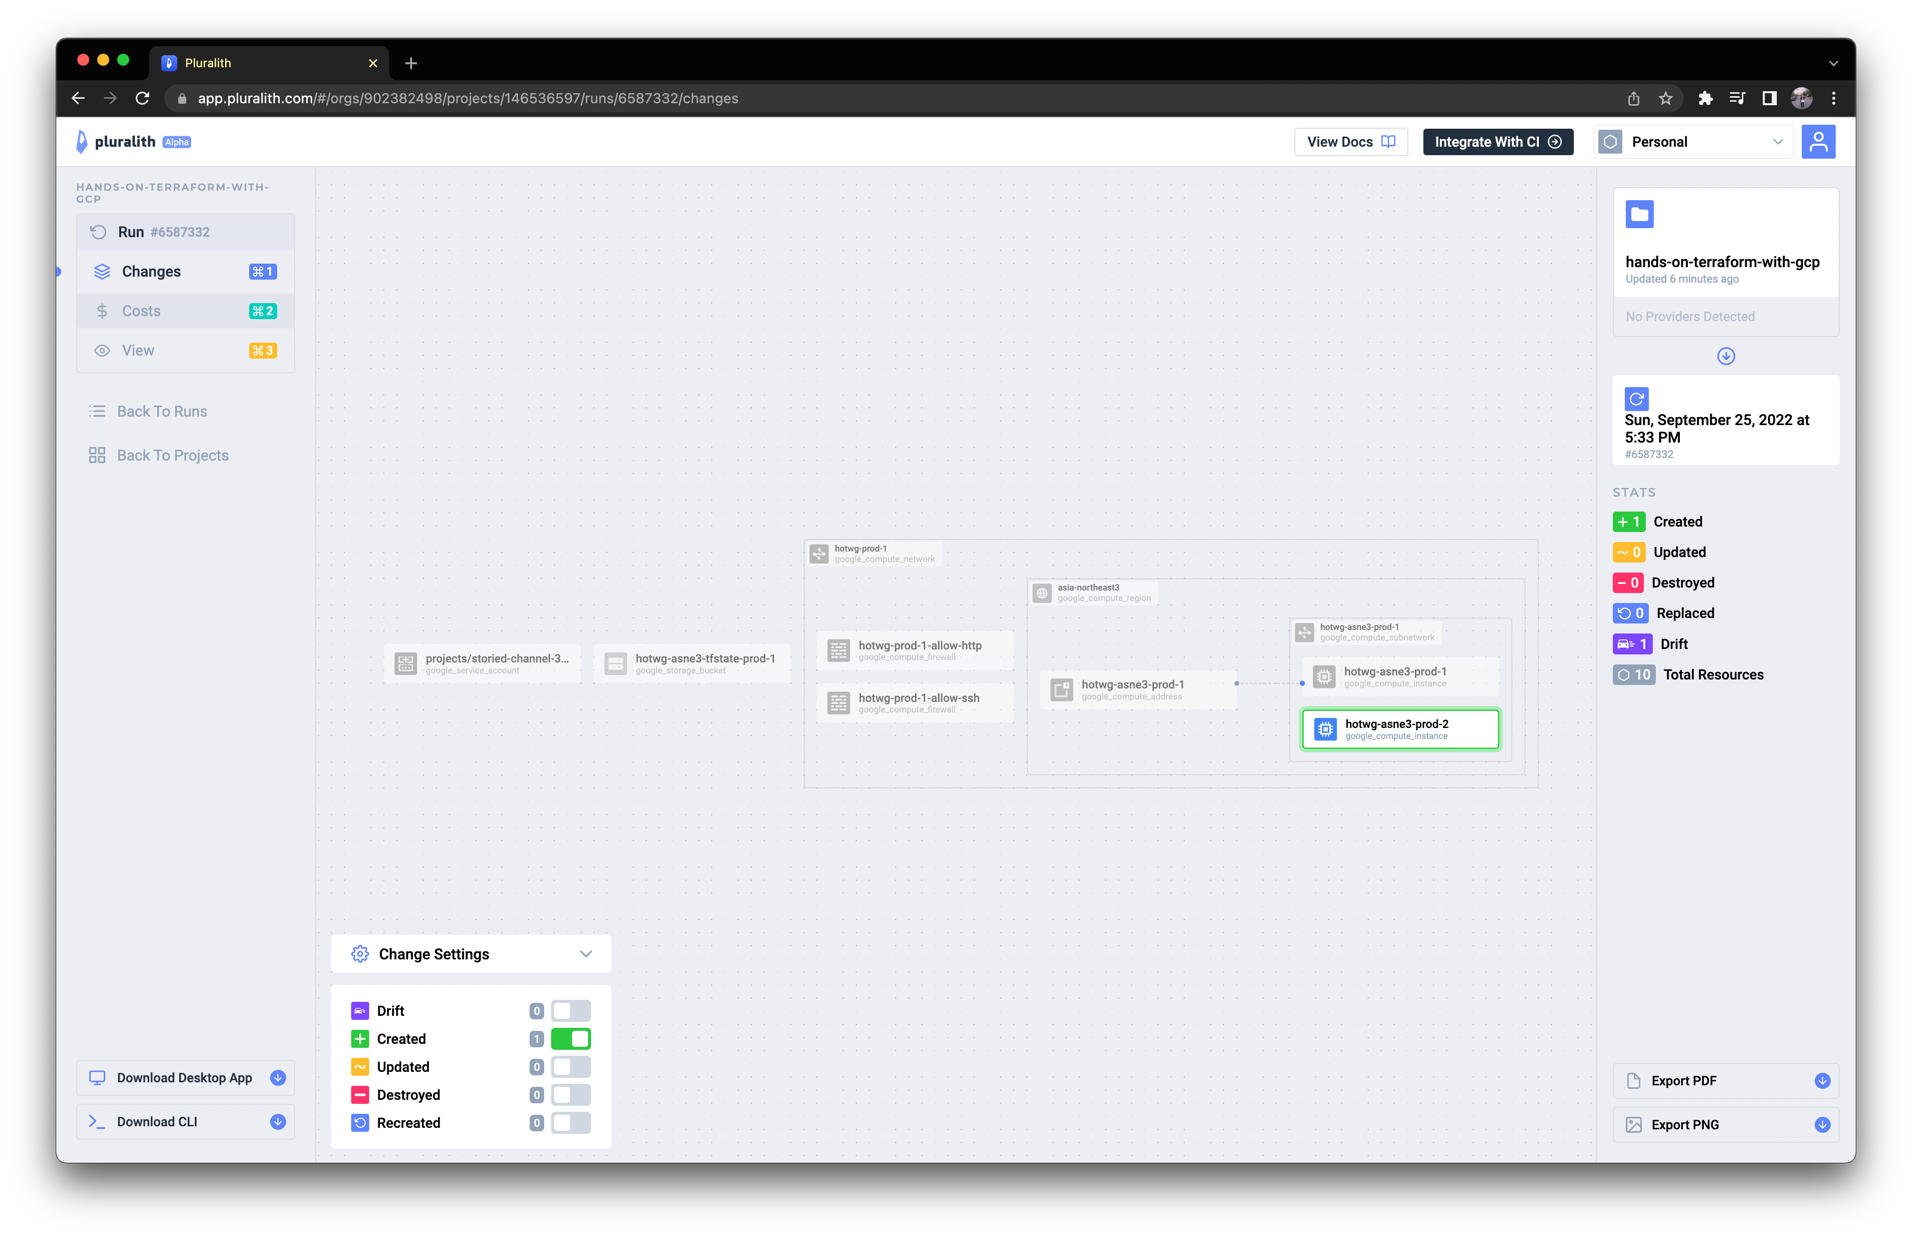
그리고 main 브랜치로 PR을 생성하면 다음처럼 Github Action의 결과가 잘 나온 것을 확인할 수 있습니다.
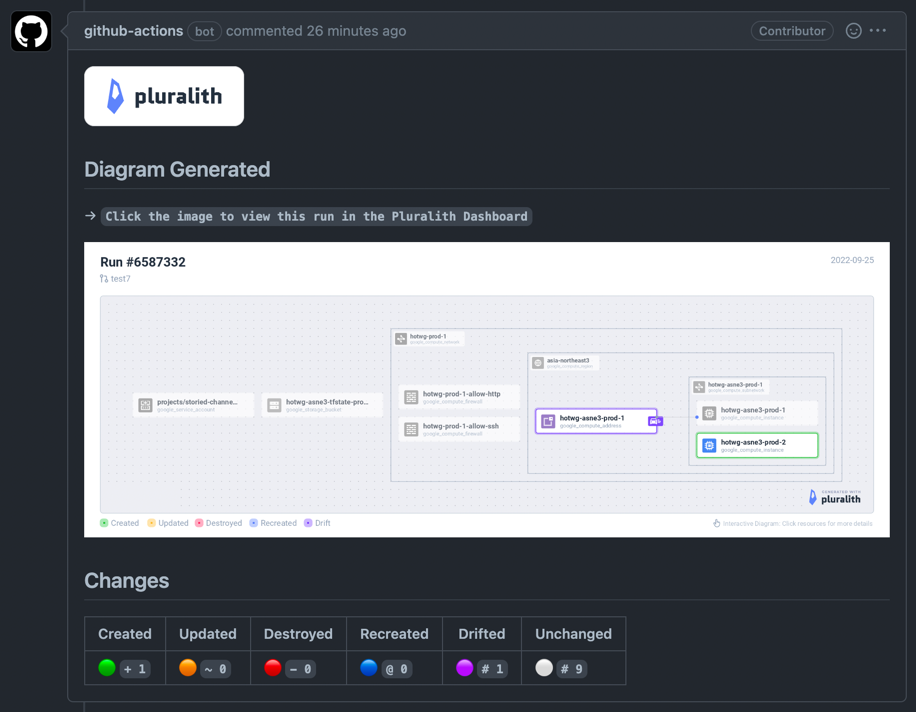
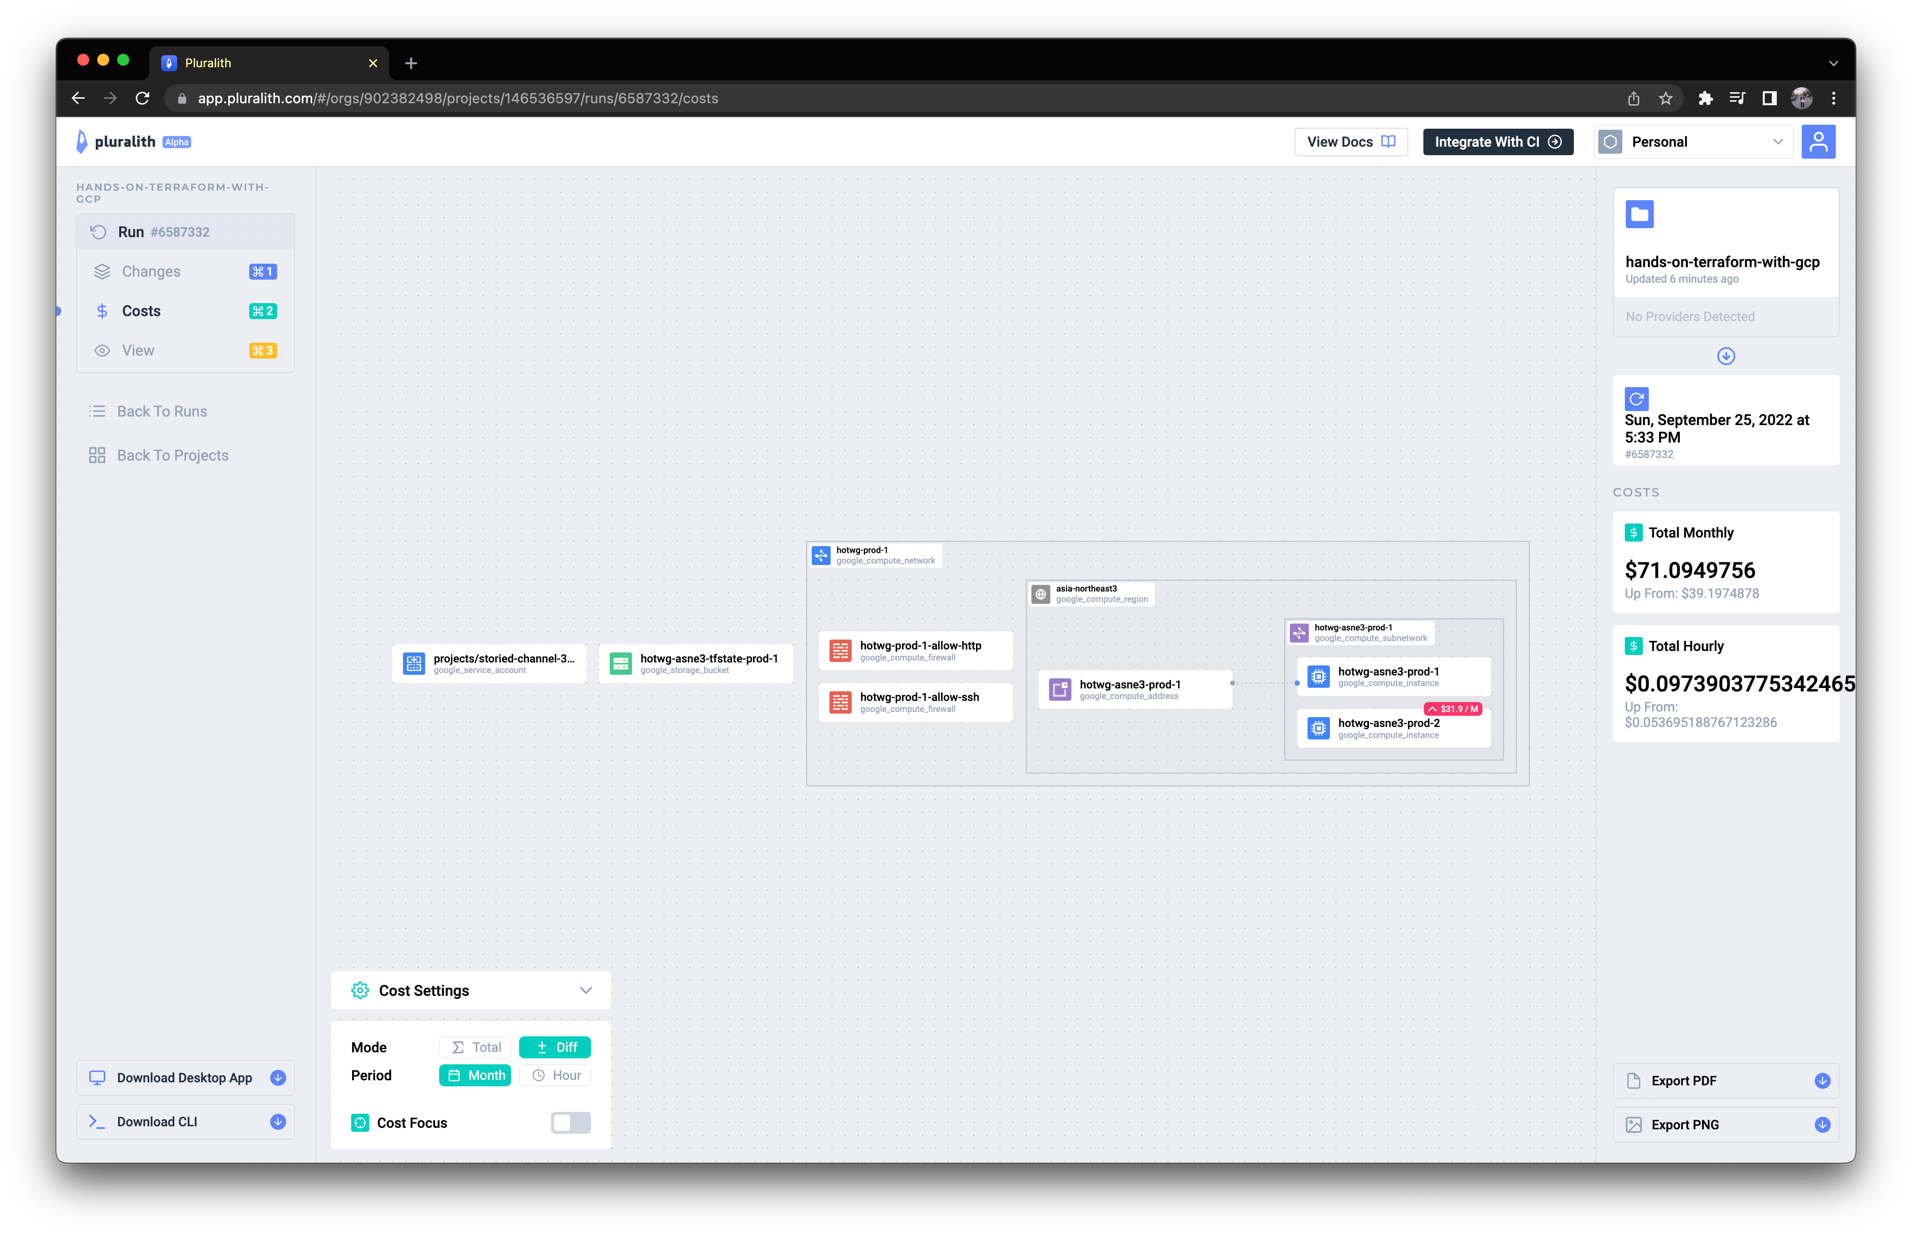
또한 다이어그램 이미지를 클릭하면 다음처럼 Pluralith 웹 대시보드에서 좀 더 자세하게 확인할 수 있습니다.